

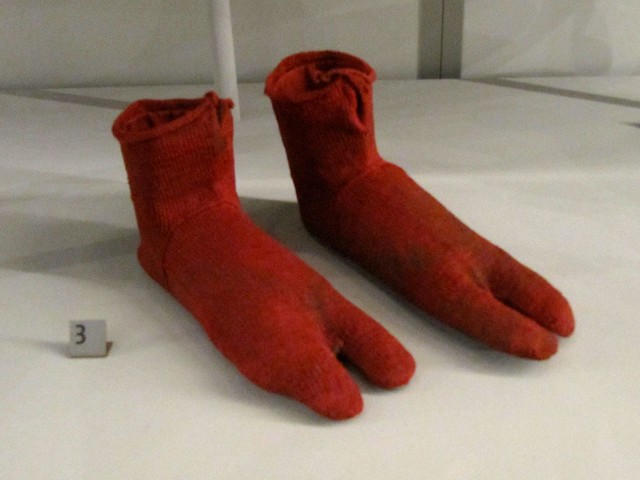
I was looking into the history of knitting in Egypt when I stumbled across a photo of these Coptic socks that were made in the 4th century. The divided toe is so that they can be worn with sandals. It looks almost identical to knitting, but it is really a very different technique called naalbinding.
 There are also ancient sample of Naalbinding found in Peru where the craft is still practiced today. In fact, variations of this craft have been found all over the world.
There are many different types of stitches that you can do using this technique. What makes it different from knitting and crochet, however, is that instead of working loops into other loops you pass the entire length of your working yarn through each stitch. To do this you use short lengths of yarn and a large blunt sewing needle. This makes it a little unforgiving, but it also makes the fabric very sturdy and difficult to unravel. If you want to know more about the basics of Naalbinding you can check it out on Wikipedia or Ravelry
Here are some photos of my first attempts at this technique.
I have enjoyed toying around with this technique and I look forward to learning more about it's history and practicing a variety of stitches.
Let me know what you think by leaving a comment.
Cheers,
Jenn
There are many different types of stitches that you can do using this technique. What makes it different from knitting and crochet, however, is that instead of working loops into other loops you pass the entire length of your working yarn through each stitch. To do this you use short lengths of yarn and a large blunt sewing needle. This makes it a little unforgiving, but it also makes the fabric very sturdy and difficult to unravel. If you want to know more about the basics of Naalbinding you can check it out on Wikipedia or Ravelry
Here are some photos of my first attempts at this technique.
 |
| Foundation Chain |
 |
| The Coptic Stitch |
 | ||
| My finished pouch. |
Let me know what you think by leaving a comment.
Cheers,
Jenn
Interesting! I'll have to check out the video cause I can't quite grasp the pulling the entire working yarn through. It looks like you did a great job on the pouch.
ReplyDeleteWow, that's so interesting, thanks for sharing! I love the texture of the fabric that you produced, it'll make a brilliant mat/rug or a sturdy bag :)
ReplyDeleteThat is really interesting. I have seen some socks from Egypt in photos and heard the term naalbinding but I've never seen it done. Your pouch looks great!
ReplyDeleteThose are pretty interesting socks. I cannot imagine how much work that technique must take. I think I'll continue to use two sticks, LOL. Thanks for sharing this.
ReplyDeleteI've heard the term but wasn't sure what it actually looked like. It does make a very dense stitch. Thanks for sharing and hope you enjoy your adventure into this new craft.
ReplyDeleteVery cool! I first heard of naalbinding from a customer, who told me it was a part of Scandinavian needlework history. Definitely a wide-spread tradition.
ReplyDeleteThat sounds really neat! Seems like it was pretty time consuming though. Beautiful bag!
ReplyDeleteIt's always nice to learn something new :) Thanks for sharing yoour findings.
ReplyDeleteThe project is awesome.
VERY COOL! Thanks for the lesson. I had never heard of this technique before today. Now, my curiosity is getting the better of me. :-D
ReplyDeleteWow that's so cool looking!
ReplyDeleteThat's fascinating. I love the history of various crafts especially fiber arts. Your pouch is very beautiful.
ReplyDeleteThat is an interesting stitch. It's always fun to find a new technique and making the pouch is a very useful way to create with the new technique.
ReplyDeleteooh, clever you...nice pouch, I'm inspired!
ReplyDelete